
I found a great source for reference and learning anatomy, the Loomis books. They can be downloaded from here: Loomis books
Fineart.sk is a great free resource for anatomy. They also have online versions of the loomis books.
Many use Poser for figuring out poses for their characters and also for reference. This is a great program, but there's a couple of free alternatives out there. One is the DAZ|Studio, which is a light version of Poser. It is quite good, but the downside is that it only includes a lowres female character, other characters have to be bought. Another solution is MakeHuman, there you can morph your character to male, female or fantasy, and ofcourse pose it. It is in alpha state yet, so much is not implemented, but for the use of refrence in a digital painting it works well. The model exports as obj, so it can be taken into any 3D program and rendered, or you can render it right from the program itself. To do that you have to install the free rendering engine Aqsis, and it renders with shaders and a sub surface scattering skin shader, not bad!
3d.sk is a good source for photo reference, but one can also here use free photo sources instead, like sxc.hu, or a cheap stock photo source like istockphoto ($1 per photo).
Photo searches like google images can be also be used for finding refrences, but be aware that there is a copyright issue if you paint too similar.
Saturday, December 09, 2006
Wednesday, December 06, 2006

Saturday, November 25, 2006
Eight Painting
Another head.

Uprezed to 2K this time. Did not use any reference, something I probably should start doing, since nothing is anatomicly correct, but hey it's a cartoony character. Blindfolded him, since I don't know how to paint eyes. So I guess I need to find a good eyes tutorial...and one for hair.
Uprezed to 2K this time. Did not use any reference, something I probably should start doing, since nothing is anatomicly correct, but hey it's a cartoony character. Blindfolded him, since I don't know how to paint eyes. So I guess I need to find a good eyes tutorial...and one for hair.
Monday, November 20, 2006
Seventh Painting
Continued playing with the scary face painting.

The background is a blurred terragen render. My next task is to practise rendering different surfaces, like cloth, metal, plastic etc. I like creating characters, so I guess I will continue that for a while. Characters need backgrounds, so there comes the matte painting practice, though I guess they call it concept painting. I really like the concept paintings by Ryan church, like the style, though he uses Painter, but I think it's possible to paint a similar style in photoshop. I hope...but it might be better to develop my own style, and not copy the masters.

The background is a blurred terragen render. My next task is to practise rendering different surfaces, like cloth, metal, plastic etc. I like creating characters, so I guess I will continue that for a while. Characters need backgrounds, so there comes the matte painting practice, though I guess they call it concept painting. I really like the concept paintings by Ryan church, like the style, though he uses Painter, but I think it's possible to paint a similar style in photoshop. I hope...but it might be better to develop my own style, and not copy the masters.
Saturday, November 18, 2006
Sixth Painting
Yup I'm back. A scary face this time.

Tried painting on a black background, and I like it. Sharpened it with smart sharpen...hmmm it kind of looks like a photo manip, but it's not. Painted with a white round brush using different opacities and softness. I use opacity instead of pressure sensitivity, since I still paint with a mouse.

Tried painting on a black background, and I like it. Sharpened it with smart sharpen...hmmm it kind of looks like a photo manip, but it's not. Painted with a white round brush using different opacities and softness. I use opacity instead of pressure sensitivity, since I still paint with a mouse.
Friday, September 15, 2006
ConceptArt.org
been checking out all those amazing sb's at conceptart.org. For those that don't know what a sb is, well then you need to go over there and check it out. It stands for sketchbook and is very similar to what I am doing here, showing the progress over time, but just soo much better. There are so many amazing artists there, why should I even bother trying this? Maybe that's the risk you run into when you're an art fan, you become the humble amazer, and just stop your own progress. check out this 22 year old for example: Andrew Lay SB
Tuesday, September 05, 2006
Painting in 3D
Tested the blender sculpt tool today, here is the result:

It works very much like zbrush, but the good thing...it's free!! It's an addon tool for the free 3D program Blender. I feel that sculpting like this in 3D is very much like painting, you use a brush, and it's very fast and fun. It took 3 hours to make the model above and about one hour to do the photoshop stuff.
Alp Altiner uses zbrush in his matte paintings, since I'm just a hobbyist I will be using the free blender sculpt tool.
Blender
Blender Sculpt Tool
Monday, September 04, 2006
Focus
I played around in photoshop again yesterday, and realized I have to narrow my focus to increase my skills in a certain area. I said earlier that I will eventually focus on matte painting, well it's time now. In matte painting I can combine photography, 3D and painting, a perfect blend of all of my hobbies. Maybe when I get a wacom tablet I will also do other kinds of art, like matte painter Christian Lorenz Scheurer does, in for example this piece, where he combines his environment skills with a character in the foreground.
So things to learn, skills to strengthen and dreams to be dreamt. Not that I'm dreaming of sitting in an office doing my art, nomather if it's for a blockbuster movie, nope that will kill the fun. Right now I'm sitting with my laptop looking at the mediterranean sea playing around in photoshop, sounds better than a dark office with a tight deadline?!...doesn't it?
The dreams are of distant excotic places I will create mattes of, like the great mountain city in the nexus range on 7 the planet in the ilios system called eilo. Hehe yep those kind of dreams :-)
Saturday, September 02, 2006
Painting with light
In 1949 John Alton wrote a very important cinematography book called "Painting with light", describing how he lights his movies. "Few cinematographers have had as decisive an impact on the cinematic medium as John Alton."
Bladerunner is a good example of a movie that is painted with light. Matrix is another good example. I like this style, dark and atmospheric.
Some of the paintings I like the most are subdued and painted with light. A good example is Steven Stahlberg's One Last Time.
Other examples: 1 2 3 4 5 6 7
Bladerunner is a good example of a movie that is painted with light. Matrix is another good example. I like this style, dark and atmospheric.
Some of the paintings I like the most are subdued and painted with light. A good example is Steven Stahlberg's One Last Time.
Other examples: 1 2 3 4 5 6 7
Sunday, August 27, 2006
Fifth Painting
Yep a space art piece (click on it to view larger version).

Starfield and planet made following the tutorials by Greg Martin (links in previous post). hmmmm many of the stars seem square...so not the best starfield, but hey it's just practice. The couple is doodled in very quickly, so if they look human...cool. The grass is made with the standard photoshop grass brush.

Starfield and planet made following the tutorials by Greg Martin (links in previous post). hmmmm many of the stars seem square...so not the best starfield, but hey it's just practice. The couple is doodled in very quickly, so if they look human...cool. The grass is made with the standard photoshop grass brush.
Saturday, August 26, 2006
Space Art
Gary Tonge makes the coolest space art around. Check it out here.
Space related art is also called Celestial art, but that is more tuned towards heavenly/dreamy characters that often have space art as a background. Here is a website with celestial art.
In my last piece of art I made a planet by following this tutorial by Greg Martin. Here is another tutorial by him about how to make a nice starfield. He also has created this article for 3DTotal discussing how to make space art. Check out his gallery here.
And lastly here is a tutorials how to make nebulaes.
Sunday, August 20, 2006
Fourth Painting
Yep, a painting on a photograph.

Here is the original Image. Took this photo a week ago. This dude controls a light canon for a live tv show.
I continue my starry night style. Guess I have to learn how to make a nice starfield next then, right now I'm just clicking with a soft brush.

Here is the original Image. Took this photo a week ago. This dude controls a light canon for a live tv show.
I continue my starry night style. Guess I have to learn how to make a nice starfield next then, right now I'm just clicking with a soft brush.
Saturday, August 19, 2006
Painting on photographs
Mattepainters usually paint on photos to make reality a bit more spectacular. Here is a good example of that: LOTR Matte. Roll the mouse over to see the original photograph. This was painted by Dylan Cole for the LOTR.
My favorite photographer painted on his photos. His name is Jan Saudek. Here's some pics from him:
Zuzanka's Night Window
Hey, Joe!
120 km/h
He also did just photographs, and pure paintings, but the ones I like the most is when he mixed the two arts.
I guess that's where I am heading, since I am a photographer learning painting, and it makes sense for me, mixing these two. Making reality a bit more exciting, isn't that what we all seek?
Sunday, August 13, 2006
Third Painting
ok, it's a weird one, but hey it's a speed painting :-)

Maybe it's a bit dark, but click on it to see a larger version. I used a couple of hours on it. Don't know the time limit for when it's speed painting or not. Actually I like the term sketch better, but maybe joining the hype is good for search engine traffic.

Maybe it's a bit dark, but click on it to see a larger version. I used a couple of hours on it. Don't know the time limit for when it's speed painting or not. Actually I like the term sketch better, but maybe joining the hype is good for search engine traffic.
Saturday, August 12, 2006
Speed Painting
I guess speed painting is a fancy word for sketching. They are both done quick and have few details, but enough to see what it is. I think this is a good way to learn painting, because one doesn't need to fickle with details forever, just getting down ideas and strengthening basic skills fast.
Check out Craig Mullins sketch gallery. Some are very rough, but still he creates an illusion of more detail. This is an amazing gallery! Here is a tutorial explaining the basic steps of his sketching process.
The good thing with these are that you can make many paintings a day, and increase your skills very fast. I have seen many styles of speedpainting, some hinting forms with finer strokes, other blocking in big shapes, and refining from there. I will just try out different stuff to see what works for me.
Sunday, August 06, 2006
Second Painting
Trying to make one each weekend. This time I'm trying a cartoon figure, Spiderman.

Made the lineart first, then basic colors with flats, and then highlights and shadows with a low opacity brush. City is made with one of I-NetGraFX brushes, and the moon is simply a circle with a blurred duplicate in the background.

Made the lineart first, then basic colors with flats, and then highlights and shadows with a low opacity brush. City is made with one of I-NetGraFX brushes, and the moon is simply a circle with a blurred duplicate in the background.
Saturday, August 05, 2006
Composition
Since my other hobby is photography, I already know some things about this topic.
- Landscape pictures should have a foreground, a midground and a background.
- The rule of thirds say that the main focal point should not placed in the middle as many do, but at the instersection of the lines shown in the pic here. The rule of thirds also suggest the horizon line to be along one of the lines and not be in the middle of the image.
- Avoid competing focal points.
- Balance the picture, in other words not to have more stuff on one side than the other.
- Objects in motion needs much space in front of the moving direction.
- It's good to direct the wandering of the eyes around the picture, make the viewer spend some time in it, and that the first path should lead to the main object of interest. And that s-shaped paths are better than straight.
- Objects should not share edges.
These are some rules I follow when taking photos, all these applies to paintings too, but since there are more control when painting other rules apply too.
- Break up big surfaces (with shadow, reflection, light, textures, imperfections etc.)
- Get the perspective right (usually two point perspective).
- Use values for depth. Objects closer should be darker and contrastier and further away should be lighter and more washed out.
- Choose a main hue for the painting, but add other hues for variation (analogous, complements or triads).
- Vary the shapes. A painting with many square shapes (f.ex. buildings) should be balanced with rounder shapes (f.ex. clouds).
Here are more rules:
Landscape Composition Rules
The Basics of Landscape Composition
Composition: Understanding it - Using it!
Rule of Thirds
- Landscape pictures should have a foreground, a midground and a background.
- The rule of thirds say that the main focal point should not placed in the middle as many do, but at the instersection of the lines shown in the pic here.
The rule of thirds also suggest the horizon line to be along one of the lines and not be in the middle of the image. - Avoid competing focal points.
- Balance the picture, in other words not to have more stuff on one side than the other.
- Objects in motion needs much space in front of the moving direction.
- It's good to direct the wandering of the eyes around the picture, make the viewer spend some time in it, and that the first path should lead to the main object of interest. And that s-shaped paths are better than straight.
- Objects should not share edges.
These are some rules I follow when taking photos, all these applies to paintings too, but since there are more control when painting other rules apply too.
- Break up big surfaces (with shadow, reflection, light, textures, imperfections etc.)
- Get the perspective right (usually two point perspective).
- Use values for depth. Objects closer should be darker and contrastier and further away should be lighter and more washed out.
- Choose a main hue for the painting, but add other hues for variation (analogous, complements or triads).
- Vary the shapes. A painting with many square shapes (f.ex. buildings) should be balanced with rounder shapes (f.ex. clouds).
Here are more rules:
Landscape Composition Rules
The Basics of Landscape Composition
Composition: Understanding it - Using it!
Rule of Thirds
Sunday, July 30, 2006
Coloring
Tested coloring with a 3D character (a free 3D model from 3dtotal.com).
And also colored my last painting, here's the result:

Here's some coloring tutorials:
Polykarbon Channel Coloring
Skintones
Digital Comics Coloring
Painting Skin Tones
Steeldolphin Digital Coloring
Art Tutorial
 |  |
And also colored my last painting, here's the result:
Here's some coloring tutorials:
Polykarbon Channel Coloring
Skintones
Digital Comics Coloring
Painting Skin Tones
Steeldolphin Digital Coloring
Art Tutorial
Saturday, July 29, 2006
First Painting
I was a bit fed up with theory, so decided just to paint something instead. So here is my first painting.

He's a weird dude, but actually I'm quite suprised it turned out quite cool. The stuff I have read must have rubbed off, because that is a significant leap forward since my first doodle. I used the grayscale method outlined here: Henning Ludvigsen Workflow. I did not use any reference, well that easy to see :-) Maybe next step is to colorize him then...
He's a weird dude, but actually I'm quite suprised it turned out quite cool. The stuff I have read must have rubbed off, because that is a significant leap forward since my first doodle. I used the grayscale method outlined here: Henning Ludvigsen Workflow. I did not use any reference, well that easy to see :-) Maybe next step is to colorize him then...
Monday, July 24, 2006
Brushes
Today I have played around with brushes. There are so many free brushes on the net, just google for it and you'll find tons.
Here are some I like:
I-Netgrafx (these are good for mattepainting).
brushes from Linda Bergkvist
Creative Mac Brushes
And there are many creative ones here:
Deviantart
Adobe Studio Exchange
 On the left is an image I made while playing around with the various brushes (click on it to see a larger version). It was very fun....and that pic is made up 100% of brushes I found today. Many of them are bitmap brushes, but I also used more normal brushes for the haze, transitions, grass and extending the water.
I also found an app where you can preview your brushes: ABRviewer. This is very useful since previewing them in in photoshop is not that fast, and one do not want to have all the brushes loaded at any time.
Here is a tutorial how you can create your own custom brush.
Here are a bunch of tutorials how to make creative cool brushes.
Here are some I like:
I-Netgrafx (these are good for mattepainting).
brushes from Linda Bergkvist
Creative Mac Brushes
And there are many creative ones here:
Deviantart
Adobe Studio Exchange
 On the left is an image I made while playing around with the various brushes (click on it to see a larger version). It was very fun....and that pic is made up 100% of brushes I found today. Many of them are bitmap brushes, but I also used more normal brushes for the haze, transitions, grass and extending the water.
 I also found an app where you can preview your brushes: ABRviewer. This is very useful since previewing them in in photoshop is not that fast, and one do not want to have all the brushes loaded at any time.
Here is a tutorial how you can create your own custom brush.
Here are a bunch of tutorials how to make creative cool brushes.
Sunday, July 23, 2006
Perspective
 This java applet pretty much explains 2 point perspective.
 Here is a great turorial on perspective and basic drawing.
Here is a tutorial how to make a 2 point perspective grid in photoshop.
In landscape paintings getting the right perspective is essential for making it look real. I have read that the most important thing in matte painting is getting the perspective and the values right, so therefore I learn these two basics first.
btw the Vanishing Point tool in photoshop can be a great tool for placing/cloning textures in perspective.
Saturday, July 22, 2006
Color theory
been reading through some tutorials about colors. Found a cool app that explains color theory quite easy, it's called Color Wheel Pro. They got a trial version to download, and it shows how the different color schemes works. It also go a help file that explains the color schemes and also the pros and cons when using the different schemes, so this is a very helpful tool in understanding color.
Another very helpful tool is the
Color Wheel Photoshop Action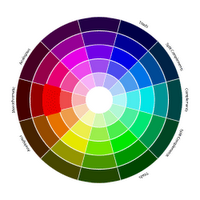 that can be found at Adobe Studio Exchange. It takes the foreground color and makes a custom color wheel based on the color schemes, in other words, a palette to use in your paintings or design.
A simple color theory tutorial can be found here.
A tip about photoshop is to switch the color pallette to HSB (by default it is RGB), because this makes it easier to change between monocromatic colors, which is the easiest color scheme to use when designing something. One only change the brightness/value and/or the saturation. Another scheme close to the monocromatic is the analogous scheme, that also creates a harmonious feel. So for webdesign or the likes, then these two works great, but in painting one also need some more contrasting colors and then the triad scheme is popular. More to read about these schemes in the tutorial and the app mentioned.
Another very helpful tool is the
Color Wheel Photoshop Action
that can be found at Adobe Studio Exchange. It takes the foreground color and makes a custom color wheel based on the color schemes, in other words, a palette to use in your paintings or design.A simple color theory tutorial can be found here.
A tip about photoshop is to switch the color pallette to HSB (by default it is RGB), because this makes it easier to change between monocromatic colors, which is the easiest color scheme to use when designing something. One only change the brightness/value and/or the saturation. Another scheme close to the monocromatic is the analogous scheme, that also creates a harmonious feel. So for webdesign or the likes, then these two works great, but in painting one also need some more contrasting colors and then the triad scheme is popular. More to read about these schemes in the tutorial and the app mentioned.
Monday, July 17, 2006
Artists
been browsing through several galleries to find inspiration and just to enjoy the diverse artwork beeing created and published on the net for all to see and discuss. Here are some artists I like:
Digital Painting:
Anry Nemo
Craig Mullins
Steven Stahlberg
Henning Ludvigsen
Linda Bergkvist
Jason Chan
Ryan Church
Gary Tonge
Bruno Gentile
Natascha Roeoesli
Phillip Straub
Jamie Jones
George Hull
Robert Chang
Khang Le
Kerem Beyit
Stjepan Sejic
Matte Painting:
Dylan Cole
Christian Lorenz Scheurer
Alp Altiner
Chris Stoski
Daniel Kvasznicza
Mathieu Raynault
Raphael Lacoste
Yanick Dusseault
As you see I have listed many Matte Painting artists...and the reason is that my motivation to learn digital painting is to go on to matte painting. In other words, learn the basics first and then move on to what I desire. I have a background in 3D, and will eventually combine 3D and digital painting Stahlberg does, but eventually move on to mattes with 3D in them, like Alp Altiner.
Those I listed was pretty much the elite, but I have also a long list of less known artists, who also deserve to be listed. There are so many amazing talents out there, and I get so inspired by browsing their galleries...so here are some I have put in my bookmark list after browsing Deviantart for some time:
anarasha
aspius
barnaulsky-zeek
bionic7
blueblack
brokenboy
cooliologyer
dilekt
eireen
fredy3d
funerium
heise
jasonengle
luminoire
melyannam
nissun
robertmekis
sallow
spyroteknik
swampy
tigaer
zilla774
Saturday, July 15, 2006
Tutorials
Been searching the web for Digital Painting tutorials. Here's my favorites:
gfxartist.com
3dtotal.com
cgsociety.com
photoshoptechniques.com
deviantart.com
photoshop101.com
henningludvigsen.com
about.com
3dbuzz.com
Some video tutorials:
manfacedgods.com
carloscabrera.com.ar
area-56.de
3d-palace.com
Another good learning tool is openCanvas, which is a shareware painting program with a record/playback functionality. In other words you can download other peoples recording of their artwork and watch it step by step being painted in openCanvas.
Thank you to all the tutorial makers! So many talents making it easy and cheap for us newbies to learn. Now it's time to dig in.
Friday, July 14, 2006
Digital Painting
The intention with this blog is to show my progress as I am learning digital painting.
I intend to spend a couple of hours every day, and will post here when there's some progress. Here is a pic of my current drawing/painting skills.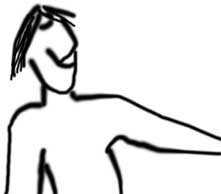 As you see, I start from scratch. I will be studying free tutorials on the net and link to those I think are good. I have learned 3D this way, and it is amazing how much free info/tutorials there are on the net these days....no need to buy a book. I also will screenrecord my progression, and upload the videos to my website (vfxdude.com) for you to see. If just my bandwith limit holds up. hmmmm I saw a host with no bandwith limit, maybe I will get an account there.
btw I have no tablet, so I will paint with a mouse. I will probably buy a tablet very soon, one is very limited with just a mouse to paint with. Pressure sensitivity is very important...
Yep that's it for today, more tomorrow...
I intend to spend a couple of hours every day, and will post here when there's some progress. Here is a pic of my current drawing/painting skills.
 As you see, I start from scratch. I will be studying free tutorials on the net and link to those I think are good. I have learned 3D this way, and it is amazing how much free info/tutorials there are on the net these days....no need to buy a book. I also will screenrecord my progression, and upload the videos to my website (vfxdude.com) for you to see. If just my bandwith limit holds up. hmmmm I saw a host with no bandwith limit, maybe I will get an account there.
btw I have no tablet, so I will paint with a mouse. I will probably buy a tablet very soon, one is very limited with just a mouse to paint with. Pressure sensitivity is very important...
Yep that's it for today, more tomorrow...
Subscribe to:
Posts (Atom)
